-
Notifications
You must be signed in to change notification settings - Fork 186
ShaderLesson6
This series relies on the minimal lwjgl-basics API for shader and rendering utilities. The code has also been Ported to LibGDX. The concepts should be universal enough that they could be applied to Love2D, GLSL Sandbox, iOS, or any other platforms that support GLSL.
This article will focus on 3D lighting and normal mapping techniques and how we can apply them to 2D games. To demonstrate, see the following. On the left is the texture, and on the right is the illumination applied in real-time.
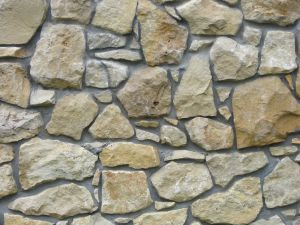
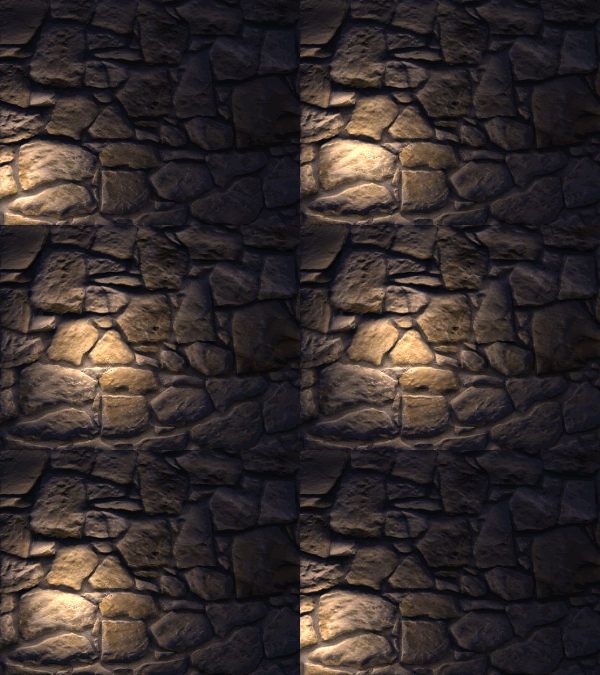
Once you understand the concept of illumination, it should be fairly straight-forward to apply it to any setting. Here is an example of normal mapping in a Java4K demo, i.e. rendered in software:
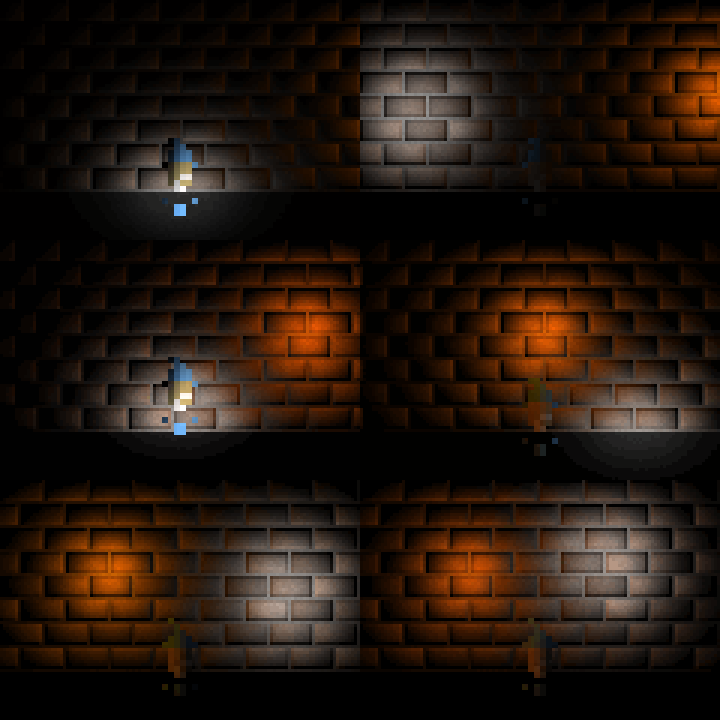
The effect is the same shown in this popular YouTube video and this Love2D demo. You can also see the effect in action here, which includes an executable demo.
- Intro to Vectors & Normals
- Encoding & Decoding Normals
- Lambertian Illumination Model
- Java Code Example
- Gotchas
- Multiple Lights
- Generating Normal Maps
- Further Reading
- Appendix: Pixel Art
- Other APIs
As we've discussed in past lessons, a GLSL "vector" is a float container that typically holds values such as position; (x, y, z). In mathematics, vectors mean quite a bit more, and are used to denote length (i.e. magnitude) and direction. If you're new to vectors and want to learn a bit more about them, check out some of these links:
To calculate lighting, we need to use the "normal" vectors of a mesh. A surface normal is a vector perpendicular to the tangent plane. In simpler terms, it's a vector that is perpendicular to the mesh at a given vertex. Below we see a mesh with the normal for each vertex.
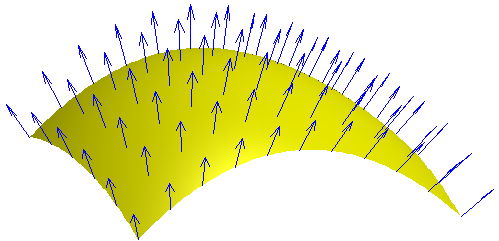
Each vector points outward, following the curvature of the mesh. Here is another example, this time a simplified 2D side view:
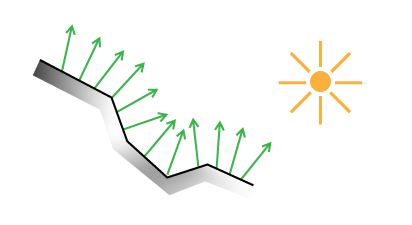
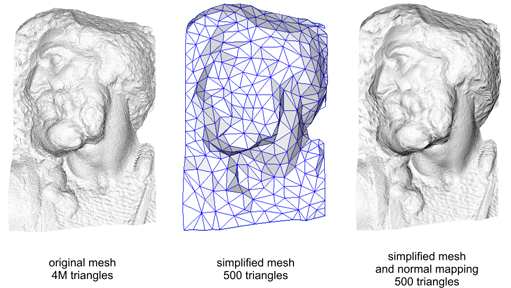
"Normal Mapping" is a game programming trick that allows us to render the same number of polygons (i.e. a low-res mesh), but use the normals of our high-res mesh when calculating the lighting. This gives us a much greater sense of depth, realism and smoothness:
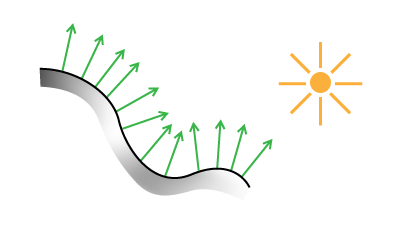
(Images from this great blog post)
The normals of the high poly mesh or "sculpt" are encoded into a texture (AKA normal map), which we sample from in our fragment shader while rendering the low poly mesh. The results speak for themselves:
Our surface normals are unit vectors typically in the range -1.0 to 1.0. We can store the normal vector (x, y, z) in a RGB texture by converting the normal to the range 0.0 to 1.0. Here is some pseudo-code:
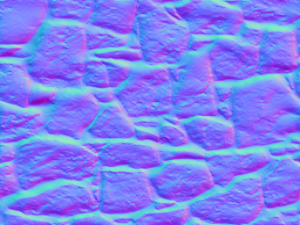
Color.rgb = Normal.xyz / 2.0 + 0.5;For example, a normal of (-1, 0, 1) would be encoded as RGB (0, 0.5, 1). The x-axis (left/right) is stored in the red channel, the y-axis (up/down) stored in the green channel, and the z-axis (forward/backward) is stored in the blue channel. The resulting "normal map" looks ilke this:
Typically, we use a program to generate our normal map rather than painting them by hand.
To understand the normal map, it's clearer to look at each channel individually:

Looking at, say, the green channel, we see that the brighter parts (values closer to 1.0) define areas where the normal would point upward, whereas darker areas (values closer to 0.0) define areas where the normal would point downward. Most normal maps will have a bluish tint because the Z axis (blue channel) is generally pointing toward us (i.e. value of 1.0).
In our game's fragment shader, we can "decode" the normals by doing the reverse of what we did earlier, expanding the color value to the range -1.0 to 1.0:
//sample the normal map
NormalMap = texture2D(NormalMapTex, TexCoord);

//convert to range -1.0 to 1.0
Normal.xyz = NormalMap.rgb * 2.0 - 1.0;
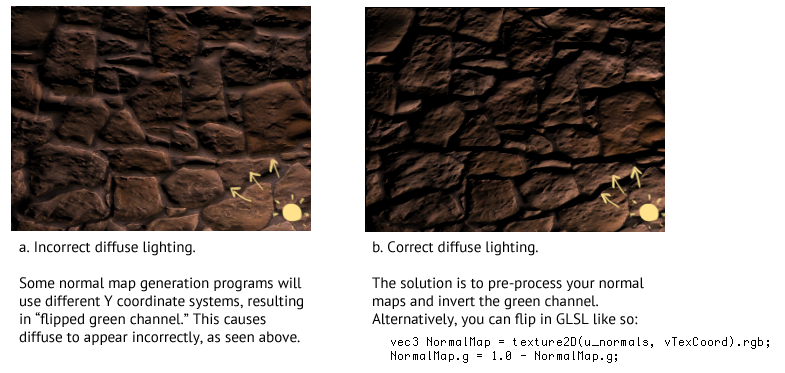
Note: Keep in mind that different engines and programs will use different coordinate systems, and the green channel may need to be inverted.
# Lambertian Illumination ModelIn computer graphics, we have a number of algorithms that can be combined to create different shading results for a 3D object. In this article we will focus on Lambert shading, without any specular (i.e. "gloss" or "shininess"). Other techniques, like Phong, Cook-Torrance, and Oren–Nayar can be used to produce different visual results (rough surfaces, shiny surfaces, etc).
Our entire illumination model looks like this:
N = normalize(Normal.xyz)
L = normalize(LightDir.xyz)

Diffuse = LightColor * max(dot(N, L), 0.0)

Ambient = AmbientColor * AmbientIntensity

Attenuation = 1.0 / (ConstantAtt + (LinearAtt * Distance) + (QuadraticAtt * Distance * Distance))

Intensity = Ambient + Diffuse * Attenuation

FinalColor = DiffuseColor.rgb * Intensity.rgb
In truth, you don't need to understand why this works mathematically, but if you are interested you can read more about "N dot L" shading here and here.
Some key terms:
- Normal: This is the normal XYZ that we decoded from out NormalMap texture.
- LightDir: This is the vector from the surface to the light position, which we will explain shortly.
- Diffuse Color: This is the RGB of our texture, unlit.
- Diffuse: The light color multiplied by Lambertian reflection. This is the "meat" of our lighting equation.
- Ambient: The color and intensity when in shadow. For example, an outdoor scene may have a higher ambient intensity than a dimly lit indoor scene.
- Attenuation: This is the "distance falloff" of the light; i.e. the loss of intensity/brightness as we move further from the point light. There are a number of ways of calculating attenuation -- for our purposes we will use "Constant-Linear-Quadratic" attenuation. The attenuation is calculated with three "coefficients" which we can change to affect how the light falloff looks.
- Intensity: This is the intensity of our shading algorithm -- closer to 1.0 means "lit" while closer to 0.0 means "unlit."
The following image will help you visualize our illumination model:
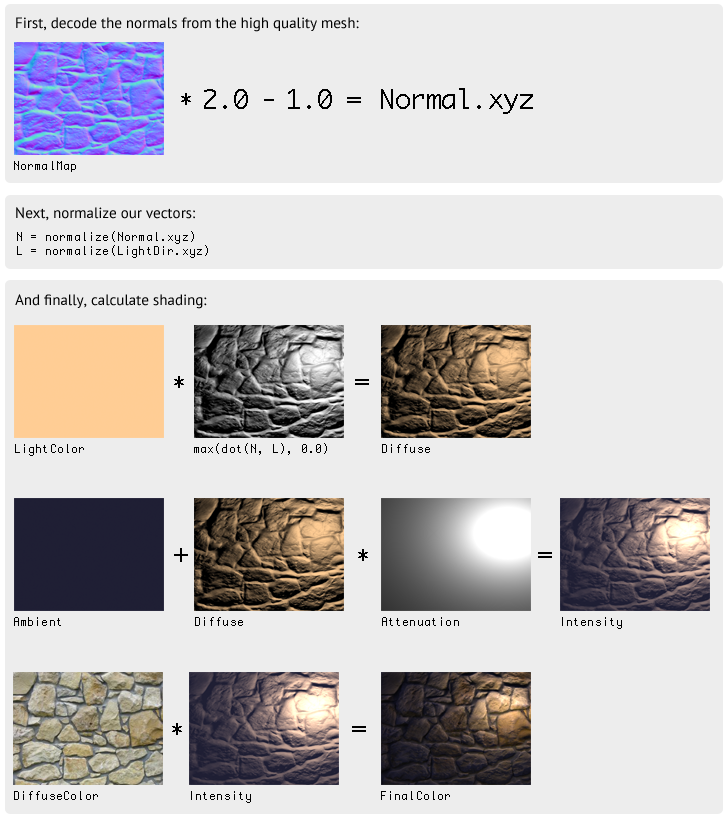
As you can see, it's rather "modular" in the sense that we can take away parts of it that we might not need, like attenuation or light colors.
Now let's try to apply this to model GLSL. Note that we will only be working with 2D, and there are some extra considerations in 3D that are not covered by this tutorial. We will break the model down into separate parts, each one building on the next.
## Java Code ExampleYou can see the Java code example here. It's relatively straight-forward, and doesn't introduce much that hasn't been discussed in earlier lessons. We'll use the following two textures:


Our example adjusts the LightPos.xy based on the mouse position (normalized to resolution), and LightPos.z (depth) based on the mouse wheel (click to reset light Z). With certain coordinate systems, like LibGDX, you may need to flip the Y value.
Note that our example uses the following constants, which you can play with to get a different look:
public static final float DEFAULT_LIGHT_Z = 0.075f;
...
//Light RGB and intensity (alpha)
public static final Vector4f LIGHT_COLOR = new Vector4f(1f, 0.8f, 0.6f, 1f);

//Ambient RGB and intensity (alpha)
public static final Vector4f AMBIENT_COLOR = new Vector4f(0.6f, 0.6f, 1f, 0.2f);

//Attenuation coefficients for light falloff
public static final Vector3f FALLOFF = new Vector3f(.4f, 3f, 20f);
Below is our rendering code. Like in Lesson 4, we will use multiple texture units when rendering.
...

//update light position, normalized to screen resolution
float x = Mouse.getX() / (float)Display.getWidth();
float y = Mouse.getY() / (float)Display.getHeight();
LIGHT_POS.x = x;
LIGHT_POS.y = y;

//send a Vector4f to GLSL
shader.setUniformf("LightPos", LIGHT_POS);

//bind normal map to texture unit 1
glActiveTexture(GL_TEXTURE1);
rockNormals.bind();

//bind diffuse color to texture unit 0
glActiveTexture(GL_TEXTURE0);
rock.bind();

//draw the texture unit 0 with our shader effect applied
batch.draw(rock, 50, 50);
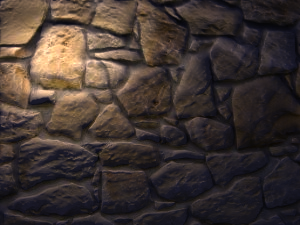
The resulting "shaded" texture:
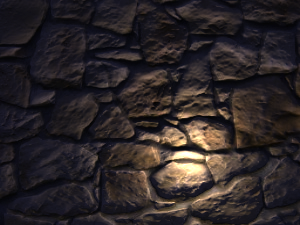
Here it is again, using a lower Z value for the light:
Here is our full fragment shader, which we will break down in the next section:
//attributes from vertex shader
varying vec4 vColor;
varying vec2 vTexCoord;

//our texture samplers
uniform sampler2D u_texture;   //diffuse map
uniform sampler2D u_normals;   //normal map

//values used for shading algorithm...
uniform vec2 Resolution;      //resolution of screen
uniform vec3 LightPos;        //light position, normalized
uniform vec4 LightColor;      //light RGBA -- alpha is intensity
uniform vec4 AmbientColor;    //ambient RGBA -- alpha is intensity
uniform vec3 Falloff;         //attenuation coefficients

void main() {
	//RGBA of our diffuse color
	vec4 DiffuseColor = texture2D(u_texture, vTexCoord);

	//RGB of our normal map
	vec3 NormalMap = texture2D(u_normals, vTexCoord).rgb;

	//The delta position of light
	vec3 LightDir = vec3(LightPos.xy - (gl_FragCoord.xy / Resolution.xy), LightPos.z);

	//Correct for aspect ratio
	LightDir.x *= Resolution.x / Resolution.y;

	//Determine distance (used for attenuation) BEFORE we normalize our LightDir
	float D = length(LightDir);

	//normalize our vectors
	vec3 N = normalize(NormalMap * 2.0 - 1.0);
	vec3 L = normalize(LightDir);

	//Pre-multiply light color with intensity
	//Then perform "N dot L" to determine our diffuse term
	vec3 Diffuse = (LightColor.rgb * LightColor.a) * max(dot(N, L), 0.0);

	//pre-multiply ambient color with intensity
	vec3 Ambient = AmbientColor.rgb * AmbientColor.a;

	//calculate attenuation
	float Attenuation = 1.0 / ( Falloff.x + (Falloff.y*D) + (Falloff.z*D*D) );

	//the calculation which brings it all together
	vec3 Intensity = Ambient + Diffuse * Attenuation;
	vec3 FinalColor = DiffuseColor.rgb * Intensity;
	gl_FragColor = vColor * vec4(FinalColor, DiffuseColor.a);
}Now, to break it down. First, we sample from our two textures:
//RGBA of our diffuse color
vec4 DiffuseColor = texture2D(u_texture, vTexCoord);

//RGB of our normal map
vec3 NormalMap = texture2D(u_normals, vTexCoord).rgb;
Next, we need to determine the light vector from the current fragment, and correct it for the aspect ratio. Then we determine the magnitude (length) of our LightDir vector before we normalize it:
//Delta pos
vec3 LightDir = vec3(LightPos.xy - (gl_FragCoord.xy / Resolution.xy), LightPos.z);

//Correct for aspect ratio
LightDir.x *= Resolution.x / Resolution.y;

//determine magnitude
float D = length(LightDir);
As in our illumination model, we need to decode the Normal.xyz from our NormalMap.rgb, and then normalize our vectors:
vec3 N = normalize(NormalMap * 2.0 - 1.0);
vec3 L = normalize(LightDir);
The next step is to calculate the Diffuse term. For this, we need to use LightColor. In our case, we will multiply the light color (RGB) by intensity (alpha): LightColor.rgb * LightColor.a. So, together it looks like this:
//Pre-multiply light color with intensity
//Then perform "N dot L" to determine our diffuse term
vec3 Diffuse = (LightColor.rgb * LightColor.a) * max(dot(N, L), 0.0);
Next, we pre-multiply our ambient color with intensity:
vec3 Ambient = AmbientColor.rgb * AmbientColor.a;The next step is to use our LightDir magnitude (calculated earlier) to determine the Attenuation. The Falloff uniform defines our Constant, Linear, and Quadratic attenuation coefficients.
float Attenuation = 1.0 / ( Falloff.x + (Falloff.y*D) + (Falloff.z*D*D) );Next, we calculate the Intensity and FinalColor, and pass it to gl_FragCoord. Note that we keep the alpha of the DiffuseColor in tact.
vec3 Intensity = Ambient + Diffuse * Attenuation;
vec3 FinalColor = DiffuseColor.rgb * Intensity;
gl_FragColor = vColor * vec4(FinalColor, DiffuseColor.a);- The
LightDirand attenuation in our implementation depends on the resolution. This means that changing the resolution will affect the falloff of our light. Depending on your game, a different implementation may be required that is resolution-independent. - A common problem has to do with differences between your game's Y coordinate system and that employed by your normal-map generation program (such as CrazyBump). Some programs will let you export with a flipped Y value. The following image shows the problem:
To achieve multiple lights, we simply need to adjust our algorithm like so:
vec3 Sum = vec3(0.0);
for (... each light ...) {
    ... calculate light using our illumination model ...
    Sum += FinalColor;
}
gl_FragColor = vec4(Sum, DiffuseColor.a);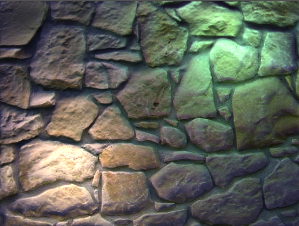
Note this introduces more branching to your shader, which may degrade performance.
This is sometimes known as "N lighting" since our system only supports a fixed N number of lights. If you plan to include a lot of lights, you may want to investigate multiple draw calls (i.e. additive blending), or deferred lighting.
At a certain point you may ask yourself: "Why don't I just make a 3D game?" This is a valid question and may lead to better performance and less development time than trying to apply these concepts to 2D sprites.
## Generating Normal MapsThere are a number of ways of generating a normal map from an image. Common applications and filters for converting 2D images to normal maps include:
- SpriteLamp - specifically aimed at 2D normal-map art
- SMAK! - Super Model Army Knife
- CrazyBump
- NVIDIA Texture Tools for Photoshop
- gimp-normalmap
- SSBump Generator
- njob
- ShaderMap
Note that many of these applications will produce aliasing and inaccuracies, read this article for further details.
You can also use 3D modeling software like Blender or ZBrush to sculpt high-quality normal maps.
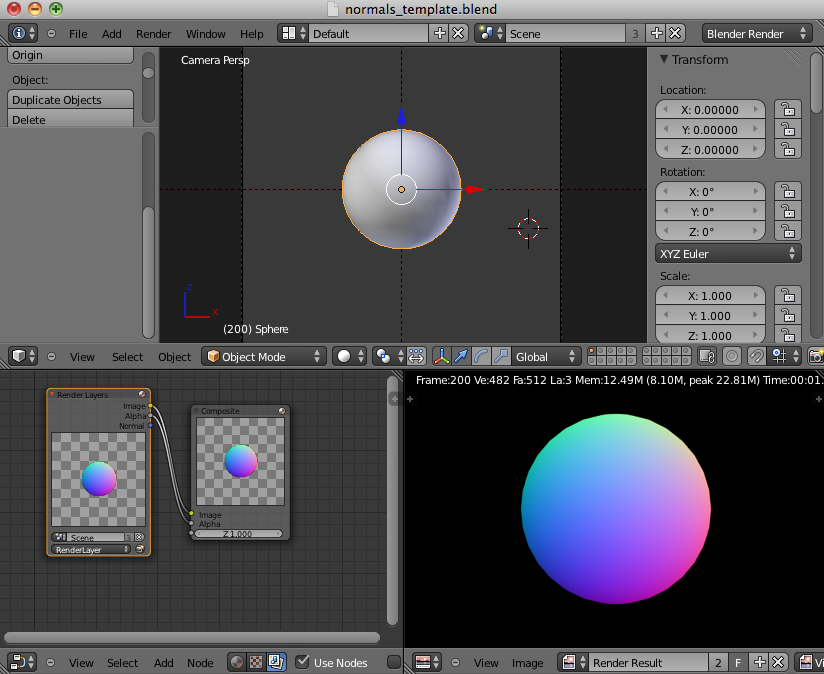
### Blender ToolOne idea for a workflow would be to produce a low-poly and very rough 3D object of your art asset. Then you can use this Blender normal map template to render your object to a 2D tangent space normal map. Then, you could open the normal map in Photoshop and begin working on the diffuse color map.
Here's what the Blender template looks like:
Here are some useful links that go into more detail regarding normal mapping for 3D games:
- UpVector - Intro to Shaders & Light
- Bump Mapping Using CG by Søren Dreijer
- Illumination Model Slides
- The Cg Tutorial
- oZone Bump Mapping Tutorial
- Bump Mapping in GLSL - Fabien Sanglard
There are a couple of considerations that I had to take into account when creating my WebGL normal map pixel art demo. You can see the source and details here.
In this demo, I wanted the falloff the be visible as a stylistic element. The typical approach leads to a very smooth falloff, which clashes with the blocky pixel art style. Instead, I used "cel shading" for the light, to give it a stepped falloff. This was achieved with simple toon shading through if-else statements in the fragment shader.
The next consideration is that we want the edge pixels of the light to scale along with the pixels of our sprites. One way of achieving this is to draw our scene to an FBO with the illumination shader, and then render it with a default shader to the screen at a larger size. This way the illumination affects whole "texels" in our blocky pixel art.